Apple PassKit framework is responsible for Apple Pay and managing user passes in Wallet app.
This time let’s talk about passes, how to create and distribute them. Wallet app allows iOS users to organize boarding passes, tickets or gifts, business and loyalty cards. In short, passes are digital representations of information that usually is printed on paper or used as plastic cards.
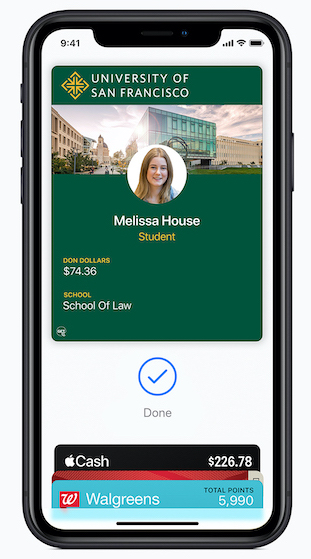
Pass building blocks
Passes are created as packages (or bundles) with extension .pass and consists of:
pass.json- file that defines the pass, image assets, and other metadata;manifest.json- file that describes files inside the pass and has SHA1 checksums of each of the files- image assets
- background of the pass
- logo - the logo in the pass header
- icon - small icon for the pass
- strip - image strip background behind the primary fields
Required fields creating a pass
When creating a pass you need to provide the pass type identifier and serial number. Type identifier is a String value using reverse DNS style - for example, pass.com.example.loyalty-card. Serial number is a string value that has a unique value in the scope of the pass type, like a membership number or a ticket identifier.
Other mandatory fields are:
- format version - file format version, usually need to use 1 (number)
- team identifier - unique 10-character identifier provided by Apple which you can find out from developer.apple.com portal
- organization name - displayed on the lock screen
- description - helps to make the pass accessible by VoiceOver
Different flavors of the pass
Passes can have different visual appearance:
boardingPass- pass for a flight, train, bus or any other type of transitcoupon- coupons, special offers or discountseventTicket- pass to enter any kind of eventstoreCard- loyalty card stylegeneric- style appropriate for any pass
Wallet app is using different layout to each of these styles. It is much easier for your users to distinguish passes and find the right one faster.
Creating passes
Creating a pass is the first step of the pass lifecycle. It happens on the server side and should be cryptographically signed and compressed. Signing process requires several steps and Apple has a manual or you can use a third party library and provide necessary certificates. By signing your passes your users can be sure that the pass is correct and not fake.
When you debug passes in iOS Simulator Wallet app you can see any errors in the system log which you can view in Console app.
Distributing passes
After creating, signing and compressing a pass into a bundle you can distribute it in several ways:
- sending with an email;
- using file sharing options like iCloud or AirDrop;
- using Add to Wallet button provided by Apple.
Using passes
Now you can provide not only barcode information but NFC data as well. When using NFC your users can simply hold the authorized device near the NFC reader and authorize the pass regardless - whether it's a flight boarding, student ID, gym membership or even a ticket for the WWDC.

TL;DR
Apple PassKit framework helps to create, distribute and manage passes that usually are printed on paper or plastic.
It is a secure way to provide a more modern way to your users using Wallet app on their iPhones or Apple Watches.
Links
- PassKit documentation
- Archived Wallet Developer Guide
- Wallet Human Interface Guidelines
- Video how to create passes
- Outdated but still relevant tutorial, Part 1 and Part 2