Every year the third Thursday of May is the Global Accessibility Awareness Day (GAAD). This time I want to focus on Dynamic Type in our iOS, iPadOS, and macOS projects. By implementing font scaling we can improve lives for loads of people with disabilities and impairments.
More than 40% of iOS users have changed the font size to non-default one. It isn’t just a bigger font size. Quite a large chunk of folks have set it to smaller just because more information fits on the screen.
We should take into account how users want to interact with the apps we build. Apple - a huge accessibility advocate has written in Human Interface Guidelines that we should use text styles that provide flexibility and adaptability by default.
What is Dynamic Type
Dynamic Type is a feature to help developers to trigger and change text size according to the user’s text settings. It has been available from iOS 7 and we should embrace it.
Users can change text size in Settings app > General > Accessibility > Larger Text. By default text size slider is in the center.
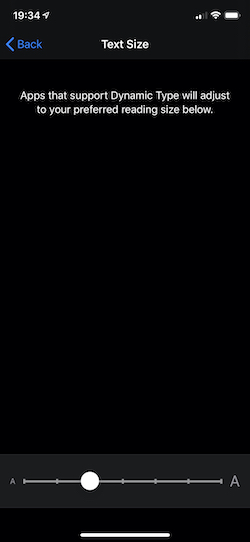
How to support Dynamic Type
The easiest way to support Dynamic Type in your apps is to use system provided text styles. By using this option we get Dynamic Type support without putting in any extra effort. For our disposal there are many text styles for titles, body, captions, and more.
Starting from iOS 11 we can implement scaling for custom fonts with UIFontMetrics. During this post, we won’t look into that.
Let’s see how we can use system text styles using UIKit and SwiftUI.
UIKit
With good old UIKit we can use Dynamic Text Styles either with Storyboard or programmatically. We will not start a battle on which one is better during this post. :)
Storyboard
In Storyboard let’s say we have a Label view. In Inspector pane we need to check the Dynamic Type checkbox.
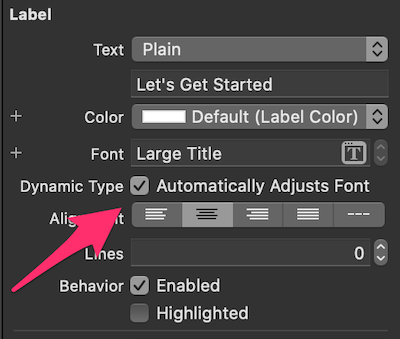
Once that is done then just change the font by selecting one of the provided Text Style.
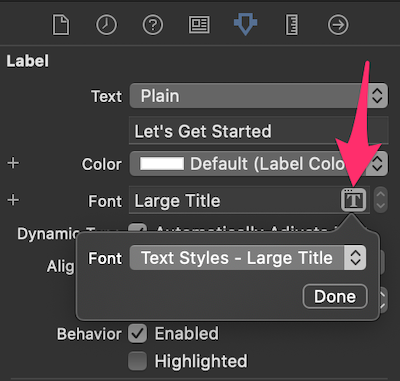
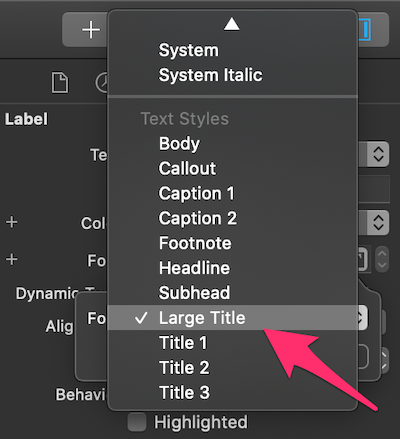
Programmatically
If we wish to create the user interface from code we need to use preferredFont(forTextStyle:) and set adjustsFontForContentSizeCategory to true. It does the same that we saw with Storyboard approach.
label.font = UIFont.preferredFont(forTextStyle: .largeTitle)
label.adjustsFontForContentSizeCategory = true
SwiftUI
SwiftUI supports font scaling out of the box for free. But once we want to set custom font we can use Dynamic Text System Style. For that, we need to use .font directive passing a text style.
struct TextView: View {
  let text: String

  var body: some View {
    VStack(alignment: .leading) {
      Text(text)
        .font(.headLine)
    }
  }
}
How to test Dynamic Type
When developing apps we can test Dynamic Type support in two ways - changing font size using Environment Overrides or Accessibility inspector. Both options can give quick and rapid feedback.
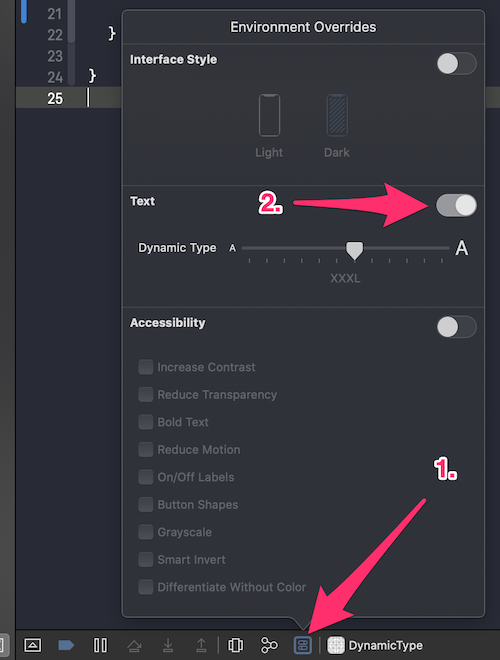
When running our app either in Simulator or on the device we can change environment variables from Debug Menu. That allows quickly to change text size and more.
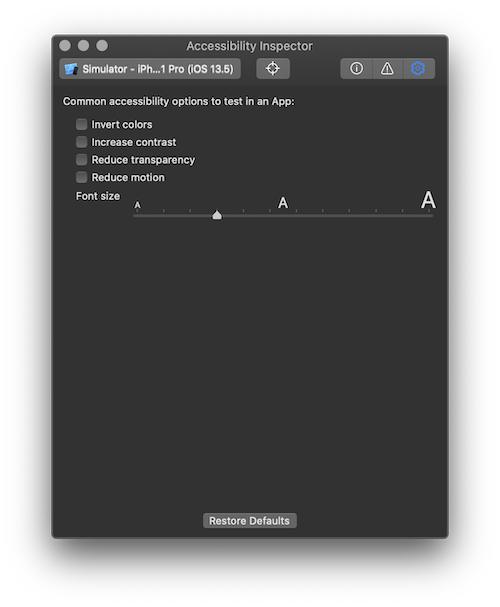
The second option is to use the Accessibility Inspector tool. This option is tailored to check how our apps support accessibility features and quickly enable, disable, or change each of them.
## TL;DR
Accessibility has been an important topic in last couple of WWDC and overall in technology. By making our apps and solutions accessible we help our current users and support new users who previously couldn’t use our apps.
Dynamic Type is an iOS feature that scales font according to the user settings. More than 40% of iOS users have changed the default system font size. Both larger and smaller.
The easiest way to support Dynamic Type is to use System Font Styles either from Storyboard or programmatically with UIKit. With SwiftUI font scaling comes out of the box, but sure enough we can use System Styles let’s say for titles and captions.
Links
- Apple Human Interface Guidelines
- Building Apps with Dynamic Type - WWDC 2017
- Supporting Dynamic Type with Custom Fonts on iOS
- Introduction to supporting Dynamic Type
- Improving Dynamic Type Support
- Dynamic Type in SwiftUI
- How to use Dynamic Type with a custom font
- Dynamic Type project with UIKit and SwiftUI
- iPS 288: Accessibility, Dynamic Type, and Voiceover with Jeff Watkins