We explored the Mapview in SwiftUI a while back. This time we will look into creating custom map annotations, the limitations, and how to overcome some of them.
Placing annotations on the map, like marking a specific place, is one of the most critical tasks when showing a map in our iOS applications.
MapAnnotation protocol
We need to look into the MapAnnotation, when working with custom map annotations in SwiftUI. We can customize it exactly how we want and then place it on the map.
As a reminder, to show annotations on the map we need a list of places that conform to the Identifiable protocol and then use it when initializing the Map view in an array.
struct Place: Identifiable {
  let id = UUID()
  var name: String
  var coordinate: CLLocationCoordinate2D
}

struct ContentView: View {
  @State private var region = MKCoordinateRegion(center: CLLocationCoordinate2D(latitude: 40.748433, longitude: -73.985656), span: MKCoordinateSpan(latitudeDelta: 0.01, longitudeDelta: 0.01))

  var empireStateBuilding =
  Place(name: "Empire State Building", coordinate: CLLocationCoordinate2D(latitude: 40.748433, longitude: -73.985656))

  var body: some View {
    Map(coordinateRegion: $region,
        annotationItems: [empireStateBuilding]
    ) { place in
      // ... create a custom MapAnnotation
    }
  }
}
Now is the time to create a custom map annotation. Let's make a custom view so we could reuse it. We can use the map circle with fill from the SFSymbols and place a pin on the bottom to show the exact location precisely.
struct PlaceAnnotationView: View {
  var body: some View {
    VStack(spacing: 0) {
      Image(systemName: "mappin.circle.fill")
        .font(.title)
        .foregroundColor(.red)

      Image(systemName: "arrowtriangle.down.fill")
        .font(.caption)
        .foregroundColor(.red)
        .offset(x: 0, y: -5)
    }
  }
}

We can use it in our 'Map' closure block now.
   Map(coordinateRegion: $region,
        annotationItems: [empireStateBuilding]
    ) { place in
      MapAnnotation(coordinate: place.coordinate) {
        PlaceAnnotationView()
      }
    }

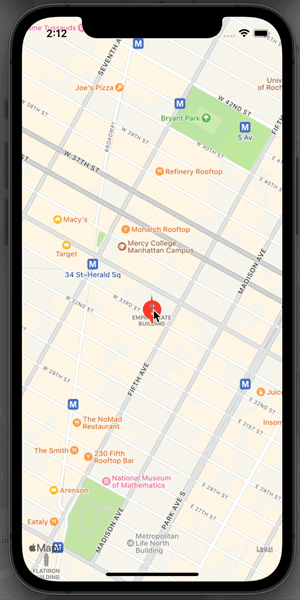
When zooming in or out, we see that annotation is placed precisely where the Empire State Building is located.
After we have the annotation on the map, we would like to somehow interact with it. Let's explore in the following sections how to show an annotation title and navigate when clicking on it.
Show and hide the annotation title
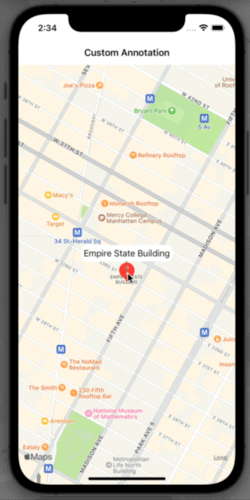
To show (and hide) the annotation title, we need to include it in the custom annotation view because we are constructing it manually.
We can add the title in the PlaceAnnotationView VStack and show or hide it when a user taps it.
struct PlaceAnnotationView: View {
  @State private var showTitle = true

  let title: String

  var body: some View {
    VStack(spacing: 0) {
      Text(title)
        .font(.callout)
        .padding(5)
        .background(Color(.white))
        .cornerRadius(10)
        .opacity(showTitle ? 0 : 1)

      Image(systemName: "mappin.circle.fill")
        .font(.title)
        .foregroundColor(.red)

      Image(systemName: "arrowtriangle.down.fill")
        .font(.caption)
        .foregroundColor(.red)
        .offset(x: 0, y: -5)
    }
    .onTapGesture {
      withAnimation(.easeInOut) {
        showTitle.toggle()
      }
    }
  }
}
We can make it appear and disappear with animation using the view state variable and changing the opacity accordingly. It would give that additional nice touch.
Another option is to show the annotation title all the time. In that case, our app users would understand without tapping what this place is.
struct PlaceAnnotationView: View {
  let title: String

  var body: some View {
    VStack(spacing: 0) {
      Text(title)
        .font(.callout)
        .padding(5)
        .background(Color(.white))
        .cornerRadius(10)

      Image(systemName: "mappin.circle.fill")
        .font(.title)
        .foregroundColor(.red)

      Image(systemName: "arrowtriangle.down.fill")
        .font(.caption)
        .foregroundColor(.red)
        .offset(x: 0, y: -5)
    }
  }
}
Navigation from map annotation
When a user taps the annotation, we would like to navigate to a different view and show extra information about this place on the map. To do so, we can put the custom annotation view inside the NavigationLink and then navigate to the location details view.
MapAnnotation(coordinate: place.coordinate) {
  NavigationLink {
    LocationDetailsView(place: place)
  } label: {
    PlaceAnnotationView(title: place.name)
  }
}
A user will be brought to the details screen after tapping the annotation. That's it!
TL;DR
Marking a place on the map with annotation is a significant feature when using a map view in iOS apps. We want to do it with a custom annotation view in many cases.
With SwiftUI, we can create custom annotations and show them on the map in a straightforward manner. It is very nice to use this approach because we have all the SwiftUI features like stacks, navigation, and more at our disposal.