When presenting a small piece of extra information on the screen, showing a modal view is essential. With UIKit, we could do this with presentViewController:animated:completion: function.
However, using SwiftUI, we need to twist our thinking towards using view or environment state, as the modal view is now called a sheet.
Let's check it out in detail.
Thank you Jānis Kiršteins for a great suggestion to use
@ViewBuilderinstead ofAnyView.
Open modal view (a.k.a. sheet)
SwiftUI sheets help us show a modal view to users. sheet is an instance method to the View Presentation. It describes how we can show our SwiftUI views, covering specific user journey scenarios.
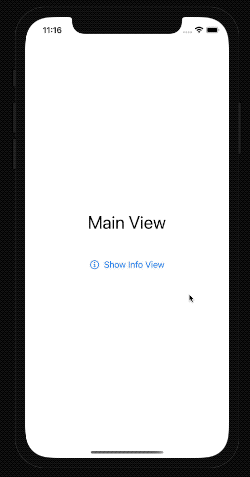
Let's say we want to display information about our app to users.
Firstly, we need to define whether the app should show a modal view or not, binding this with the Bool value.
The keyword here is 'should' because once we dismiss, the presented view value is set back to false. This value is decorated with a @State property wrapper, or could come from ObservableObject ViewModel. For simplicity reasons, we're not going to talk about ViewModels in this post.
Secondly, we need to change the view or, in some cases, the environment state. Once we are using the @State property wrapper, we can just set it to true and SwiftUI will do the rest to present the modal view.
Let’s look how we can do it in the code:
struct ContentView: View {
  @State var showInfoModalView: Bool = false

  var body: some View {
    VStack(spacing: 50) {
      Text("Main View")
        .font(.largeTitle)

      Button(action: {
        showInfoModalView = true
      }, label: {
        Label("Show Info View", systemImage: "info.circle")
      })
    }
    .sheet(isPresented: $showInfoModalView) {
      InfoView()
    }
  }
}
When we run the app, we can now open the modal view and see the detailed information.
Close modal view programmatically
Our app users can simply slide the modal view down, and it will hide with a nice animation. Set the state to false to hide this from the view responsible for showing the modal view.
Now is the question of how to do it from the modal view itself? We have these two options at our disposal:
- using
@EnvironmentpropertypresentationMode; - passing the state to the modal view as binding.
Using Environment
Property wrapper @Environment allows us to read and change the values of the view environment state. To hide the modal view, we need to change the presentationMode property. At first, we need to define our view. To do this, we add it to the modal view properties. To dismiss the modal view, we need to alter the presentation mode wrapped value.
struct InfoView: View {
  @Environment(\.presentationMode) var presentationMode

  var body: some View {
    VStack(spacing: 50) {
      Text("Information view.")
        .font(.largeTitle)

      Button(action: {
        presentationMode.wrappedValue.dismiss()
      }, label: {
        Label("Close", systemImage: "xmark.circle")
      })
    }
  }
}
This method is quite cumbersome, and dealing with environmental properties can cause accidental issues that are difficult to track down and debug.
Using a binding
Using a binding between the view that is presenting the modal view and the modal view itself is another method to hide it from the code.
First, we need to add a new property to the modal view structure using @Binding property wrapper. This describes that this value comes from somewhere else outside the view scope.
struct InfoView: View {
  @Binding var isPresented: Bool

  var body: some View {
    VStack(spacing: 50) {
      Text("Information view.")
        .font(.largeTitle)

      Button(action: {
        isPresented = false
      }, label: {
        Label("Close", systemImage: "xmark.circle")
      })
    }
  }
}
Now when we are initializing the ModalView we need to pass the isPresented:
.sheet(isPresented: $showInfoModalView) {
  InfoView(isPresented: $showInfoModalView)
}
Using this approach, we are sure that this variable only belongs to these two views. It is more straightforward to test and debug.
Multiple sheets on one SwiftUI view
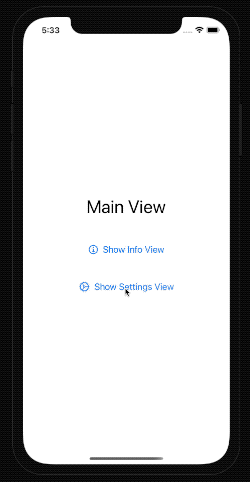
Now we know how to present a modal view, but how can we show multiple modal views?
Imagine we would like to present information about the app and the settings view from the primary app view.
We can do this using these two approaches:
- using multiple sheets presenting functions;
- using
Identifiableenum to keep the state of the currently shown sheet.
Multiple sheet functions in one SwiftUI view
We can attach sheet function to any SwiftUI view or control, for instance to the Button:
struct ContentView: View {
  @State var showInfoModalView: Bool = false
  @State var showSettingsModalView: Bool = false

  var body: some View {
    VStack(spacing: 50) {
      Text("Main View")
        .font(.largeTitle)

      Button(action: {
        showInfoModalView = true
      }, label: {
        Label("Show Info View", systemImage: "info.circle")
      })
      .sheet(isPresented: $showInfoModalView) {
        InfoView()
      }

      Button(action: {
        showSettingsModalView = true
      }, label: {
        Label("Show Settings View", systemImage: "gear")
      })
      .sheet(isPresented: $showSettingsModalView) {
        SettingsView()
      }
    }
  }
}
It can be fine to have two buttons, but let's say we have more than that. It can get quite messy, so we should deal with many @State variables.
Using enumeration of all modal views
If we look at Apple's official documentation, there is another function) to show a sheet. Let's try to use it.
At first, we will define an enum with all modal view options:
enum Sheet: Identifiable {
  case info
  case settings
}
Now we can use this in the SwiftUI view. We need a new @State variable with the optional type Sheet and to use this to determine which modal view we would like to present.
enum Sheet: Identifiable {
  case info
  case settings

  var id: Int {
    hashValue
  }
}

struct ContentView: View {
  @State var activeSheet: Sheet?

  var body: some View {
    VStack(spacing: 50) {
      Text("Main View")
        .font(.largeTitle)

      Button(action: {
        activeSheet = .info
      }, label: {
        Label("Show Info View", systemImage: "info.circle")
      })

      Button(action: {
        activeSheet = .settings
      }, label: {
        Label("Show Settings View", systemImage: "gear")
      })
    }
    .sheet(item: $activeSheet) { sheet in
      switch sheet {
      case .info:
        InfoView()
      case .settings:
        SettingsView()
      }
    }
  }
}
We don't need to stop here. We can declutter this code by adding a computed property to Sheet enum:
extension Sheet {
  @ViewBuilder
  var modalView: some View {
    switch self {
    case .info:
      InfoView()
    case .settings:
      SettingsView()
    }
  }
}
Then we can use it when opening the sheet:
.sheet(item: $activeSheet) { $0.modalView }
Using the fancy new keypaths functionality in closures, we can simplify this even more:
.sheet(item: $activeSheet, content: \.modalView)
One caveat to this approach is that we need to change part of our process to hide the view from the code. To do this, we set it to nil instead of false.
This approach is much safer, because we use the enumeration type to keep everything well organized.
Let's see it in action.
TL;DR
Modal views in SwiftUI are presented using the sheet modifier on a view or control. The simplest way is to have @State property to indicate when it should be visible.
To hide the modal view, we can use the environment parameter or pass a binding to the modal view object. Showing multiple sheets can be achieved either with multiple sheet modifiers or using an object with all possible modal view enumerations.